| Contents
|
 |
Contents
Basics
Performance figures are important - not only for the glossy catalogues of engine manufacturers, but also for the modeler, who wishes to find the best engine for his model. Unfortunately, most manufacturers only give a value for the maximum performance but do not specify the conditions, under which they have achieved this performance. Reality often shows, that these performance figures cannot be obtained under normal operating conditions, may it be due to noise reasons or due to a different fuel mixture or varying environmental conditions.
Some model magazines regularly review model engines and often show performance figures and charts, but usually they do not tell you, how these data were collected. Here, I will show, how a test bench for performance measurements can be set up, calibrated and used for measurements. This type of test bench is only one possible design, not the only one, and maybe even not the best one, but it is simple and produces very accurate results.
The performance of an engine (internal combustion or electric) is usually given by the power P (unit: Watt) for a certain velocity of rotation n (unit: per minute). Combining the power for different rpm values into one table or chart results in the usual diagram of power versus rpm, which can be found in engine reviews.
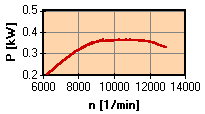
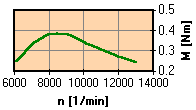
Power versus velocity of rotation and the corresponding plot of torque.
The torque plot can be calculated from the power graph and vice versa.
The power of an engine is defined by the product of torque Q (unit: Nm) and angular velocity Omega (unit: 1/s), which can be expressed by the following formula:
P = Q·Omega .
To calculate the angular velocity Omega from the velocity of rotation n, which we can measure in RPM (1/min) , we use the relation
Omega = n/60·2·pi
and combining with the first equation we finally get
P = Q·n/60·2·pi (pi is constant and equals 3.141592654...).
We cannot measure the power P directly, but we can measure the torque Q and the velocity of rotation n and calculate the power from these two values.
This value can be measured quite accurately with an electronic tachometer, which is available from several sources. These devices are usually very accurate. Most of these tachometers work optically, without touching the engine, by counting pulses from the passage of each propeller blade - some have the disadvantage, that they don't work well when the sun is too bright or when the sun is going down.
The torque of the engine can be measured by different methods. One possible set-up, described here, can be built without a lot of metal work. The general idea is to attach the engine to the end of a shaft, which is parallel to the crankshaft. Because of Newtons «actio est reactio», an engine, which is turning a propeller clockwise, would start to spin counterclockwise around the shafts axis. Being clever, we support the shaft by ball bearings to avoid friction and stop it from rotating by adding a horizontal lever, whose free end pushes on a force measuring device. Such a force measuring device (e.g. a so called load cell) is quite expensive, but we can use an electronic scale, which may be found in your wives kitchen (although you'd better go out and buy one of your own for the test bench!). The scale should operate up to a maximum mass of 1or 2 kilograms for normal engines, its price will be about 50$ to 100$. Try to get the one with the best resolution (the smallest step size should not be larger than 1 g for a 1 kg maximum).
If you want to test very different engine sizes, you could use different lengths for the lever, but it might be better to build a special testing bench for different engine sizes. For engines up to 10 cm³ (.60 engines) the lever should have a length of 200 mm, for larger engines it should be made longer.
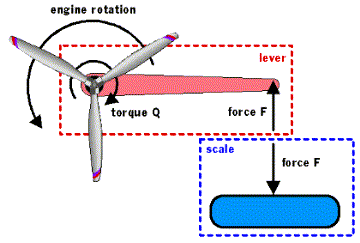
Schematic of the forces and moments acting on the lever and on the scale.
The force, which is acting on the scale, can be calculated from the torque of the engine and the length of the lever. To find the maximum length of the lever for your desired engine class, you pick the maximum torque of an engine and divide it by the length of the lever. Find test results of an engine, which include the torque vs. rpm figures. If they only show power vs. rpm, you can calculate the torque vs. rpm values by using the rearranged equation, given above:
Q = P / (n/60·2pi) .
| Example: | We expect a torque of 1.5 Nm and are intending to make the lever 200 mm
long. Will our scale (range 0...1000 g) be sufficient?
The force acting on the scale is 1.5 / (200/1000) = 7.5 N, which will be shown on the scale as the equivalent mass of 7.5 / 9.81 = 0.766 kg = 766 g. Thus we can use our scale without problems. |
Internal combustion engines, which have a single cylinder in most cases, distribute their moment during a short period of time per revolution. This could lead to oscillations of the test bench, which would lead to incorrect measurements. This problem can be remedied by increasing the resistance against oscillations, e.g. by adding a pendulum mass below the axis of the bench. The deflection of the lever during a measurement should be as small as possible - typical scale move less than 10 mm between the minimum and the maximum force.
To start the engine, we need a means to fix the axis against rotation, which can be accomplished by a removable pin, which passes through the shaft.
For simplicity we will use different propellers to force the engine to run at different speeds. The propellers cause a swirl in their wake, which hits the engine at an angle, which might introduce an error to our torque measurements, especially when using large exhaust systems (tuned pipes). Shielding the engine and the exhaust system from the swirl by adding two vertical plates on both sides of engine and exhaust will reduce this influence. These plates have to be fixed to the bench, not the axis of the bench.
Before the first measurements are started, a calibration of the torque measurement apparatus is necessary. There are several uncertainties, which makes this necessary: the length of the lever may be inaccurate, the quality of the scale is not known and the bearings of the bench shaft may have too much friction. The calibration must be repeated as often as possible - at best before and after each test campaign - to make sure than nothing has changed.
For the calibration we fix an additional horizontal bar with a length of 1000 mm or more to the shaft of the bench, so that it is centered (both ends have the same distance from the axis of the shaft). The scale should be zeroed or, if not possible, the current force must be noted. You will have subtract this value from all subsequent measurements. On the additional lever, we mark a distance of e.g. 500 mm from the shafts axis as exactly as we can. This is the point, where we will all single pieces of metal, suspended by a thread. The idea is to suspend different masses from this point to cover the whole range of our scale. The mass of these weights has to be measured before our calibration tests. By adding and removing weights, we move from zero to the maximum of the scale in small steps, noting the weight and the corresponding readout of the scale. after reaching the maximum we go back again, reducing step by step until we reach zero again. The more points we sample, the better will be our picture for the accuracy of the set-up. It might also be interesting to perform a calibration at different temperatures, because the scale might be not compensated perfectly with respect to the temperature influence.
For each data point taken, we calculate the torque Q and prepare a graph showing torque versus readout of our scale. The torque can be calculated by multiplying the mass, suspended on the lever, by the gravity constant and the distance between suspension point and the axis of the benches shaft, th length L:
Q = m·9.81·L .
Ideally, the points on the graph should fall onto a straight line, which connects them all. Any scatter indicates the accuracy of our equipment. If the points fit to a curved line, either the scale may be non-linear or there is a friction problem with our set-up. Friction should also be visible if the points from increasing the load follow a different curve than the points from the decreasing part of the data. Any friction problem might be reduced due to the vibrations of the engine, but it is no good idea, to rely on this hope. If the scale is non-linear, this is no problem, because we will use the calibration chart to translate the readout of the scale into torque. Therefore the graph should be done accurately and be large enough.
For the measurements we need a sufficiently large stock of different propellers, which will cover the desired velocity of rotation range. For a good result as much data points as possible should be taken, more than 20 are usually needed to get a clear view of the performance curve. If results with a single propeller don't fit into the cloud of results, they should be repeated. Because the temperature of the engine is different for different propellers there will be different readouts for the same velocity of rotation. The cooling and intake flow conditions in flight might be different again, leading to a different power output in the air.
For each propeller, the carburetor may be adjusted to give the maximum continuous moment and rpm values. When we have adjusted the mixture (and the exhaust system for the tuned pipe engine), we note the rpm value and the readout of the scale. Then we lookup the torque in our calibration chart and calculate the power output
P = Q·n/60·2·pi .
We see, that we can implement the term 1/60·2·pi into our torque table, which would then contain an additional column which gives the power for a velocity of rotation of [1 rpm]. Then we only have to pick the value from this column and multiply it with the actual rpm value to get the power.
Each data point should be added to a plot of power and torque versus rpm until the whole rpm range of interest is sufficiently covered.
It is wise to start testing with an engine, whose performance is known (e.g. from a published test), so that your results can be compared. It is also possible to bench test an electric motor, whose performance is known and whose input power can be checked easily by measuring voltage and current. The output power will usually reach between 60% and 80% of the input power.
Most published performance results show smooth curves, suggesting that the tested engine follows the line exactly. If you perform tests by yourself, you will quickly learn, that the data resemble a more or less dense cloud and you may be able, after deleting some errors, to draw a curve fit through the scatter. You will also notice, that the curve is not necessarily perfectly smooth, but may have waves and kinks instead.
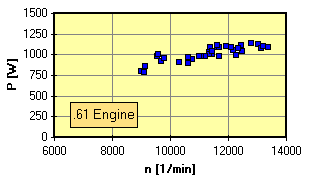 |
A typically scattered set of raw test data, without retesting or dropping values. There seems to be a distinct power peak around 9500 rpm. |
We have to keep in mind, that a combustion engine (and especially a two-stroke engine) contains various chambers of different volumes and characteristic lengths, which can, and probably will, go into resonance (tuned pipes, intake throats, crankcase volume) at different frequencies. The result will be a more or less wavy power curve. Also, the cooling of the engine is very important and should resemble the real world operating conditions.
For marine and car engines, dynamic testing can be done, using an inertia dynamometer (acceleration method). For application in pylon racing and control line speed, the operating conditions are much more steady, which may render these acceleration tests useless, though.
In order to compare performance data, it is necessary to normalize the data to standard conditions. The performance mainly depends on temperature, humidity, and pressure, which are used to correct the power output and the rotational velocity of the engine [more information can be found here].
Last modification of this page: 21.05.18
![]()
[Back to Home Page] Suggestions? Corrections? Remarks? e-mail: Martin Hepperle.
Due to the increasing amount of SPAM mail, I have to change this e-Mail address regularly. You will always find the latest version in the footer of all my pages.
It might take some time until you receive an answer
and in some cases you may even receive no answer at all. I apologize for this, but
my spare time is limited. If you have not lost patience, you might want to send
me a copy of your e-mail after a month or so.
This is a privately owned, non-profit page of purely educational purpose.
Any statements may be incorrect and unsuitable for practical usage. I cannot take
any responsibility for actions you perform based on data, assumptions, calculations
etc. taken from this web page.
© 1996-2018 Martin Hepperle
You may use the data given in this document for your personal use. If you use this
document for a publication, you have to cite the source. A publication of a recompilation
of the given material is not allowed, if the resulting product is sold for more
than the production costs.
This document may accidentally refer to trade names and trademarks, which are owned by national or international companies, but which are unknown by me. Their rights are fully recognized and these companies are kindly asked to inform me if they do not wish their names to be used at all or to be used in a different way.
This document is part of a frame set and can be found by navigating from the entry point at the Web site http://www.MH-AeroTools.de/.